

The Text
The first thing we need to do is to create the actual text. We do this by creating a NURBS curve, extruding it along its axis, and finally capping the ends. First of all, start with a fresh new scene by choosing File -> New.
1. Make sure you are in modelling mode by pressing the pulldown menu under File, and choosing Modelling.
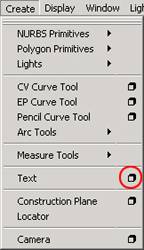
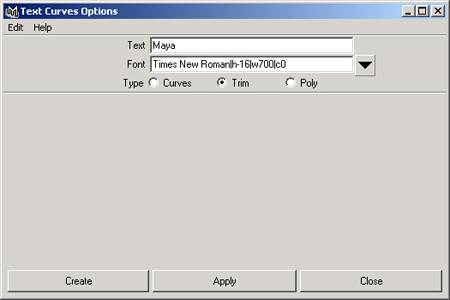
2. Then press Create -> Text and the box next to Text (This box will from now on be called options). This opens up a new window where you can adjust the settings of the text. If you had just clicked Text, it would have used the default or the last used settings.
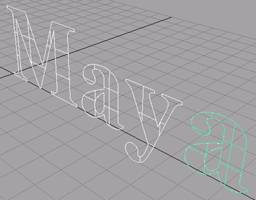
3. Type in your text in the Text field and choose which font you want to use. Set the type to be Trim, to make sure the text shape is filled, and not just an empty shape. Finally press Create.
Now we've got the front of the text. But what we want is 3D text. To achieve that we need to extrude it along it's axis.
1. Select you text by pressing and holding the left mouse-button and drawing a square around the text. The text should then turn white, except the last letter which should turn green.
2.
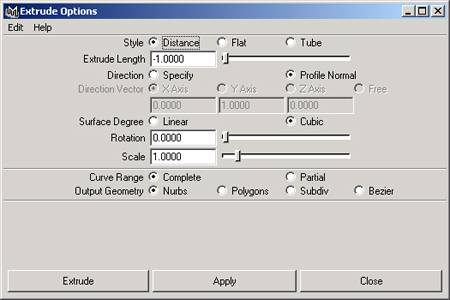
Then press Surfaces -> Extrude options. This should open the Extrude window. Select style as distance, as we want to extrude the text into the distance.
3. Next choose how far you want the text to extrude by either pulling the slider, or by typing a value directly into the Extrude Length field. For this example, go for a negative value. I used -1.0000.
4. Make sure the bottom options are as follows. Curve Range: Complete, Output Geometry: NURBS.
5. Let the other options have their default values and click Extrude.
Now we have a 3D text. You might notice that the text has some jagged and angled edges. This is because Maya doesn't draw NURBS surfaces with highest detail on the screen. It renders perfectly on the other hand.
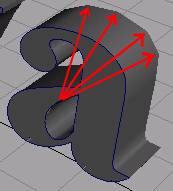 To make Maya draw the text using high-detail in the viewport, select the NURBS object and press [3] on your keyboard. This should make the jagged edges on your text disappear. If you now press [6] on your keyboard, you should see a rough realtime rendering of the object. If you now press and hold [Alt] while left-clicking and dragging your mouse in the viewport, the view should rotate around the text. If you rotate to the back of the text, you can see that there are holes at the back of the text. It doesn't look solid as it does from the front. This is perfectly fine if you only intend to view the text from the front, but if you want to see it from the back as well, we need to perform a little trick. If you can't see close enough to the text, you've got to zoom in on the text. This is almost as easy as selecting text, but not quite. Hold [Ctrl]-[Alt] in while you drag a square around the text from the top-left to the bottom right. It is important that you drag from the left to the right cause if you drag from the right to the left, you zoom out!
1. Press Window -> Outliner to open the outliner. From here you can easily select different elements from your scene. Select Trim_Text_[your text]_1 (Or something that looks very like it). This should select the front of the text.
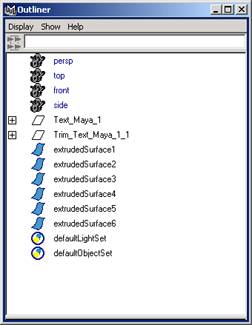
2. Now minimize the Outliner.
3. Then press Edit -> Duplicate options, to open the window where you can duplicate objects.
4. In the last Translate field, enter the value you used to extrude the text. In this example this was -1.0000, and we'll use that. Make sure Number of Copies is set to 1 and that Geometry Type is set to Copy. Then press Duplicate.
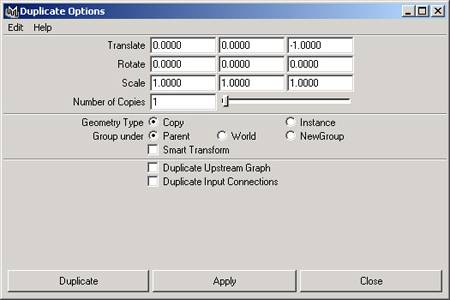
This should make a copy of the front of the text, and place it directly at the back of the object. Now use [Alt] to rotate your viewport again to see the back of the object. It should now look perfectly solid.
Now we are ready to add a material to the text.
| Introduction |

